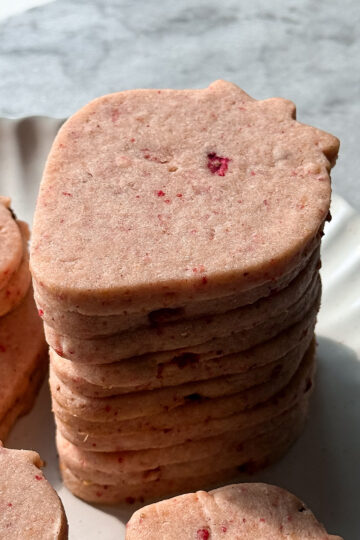
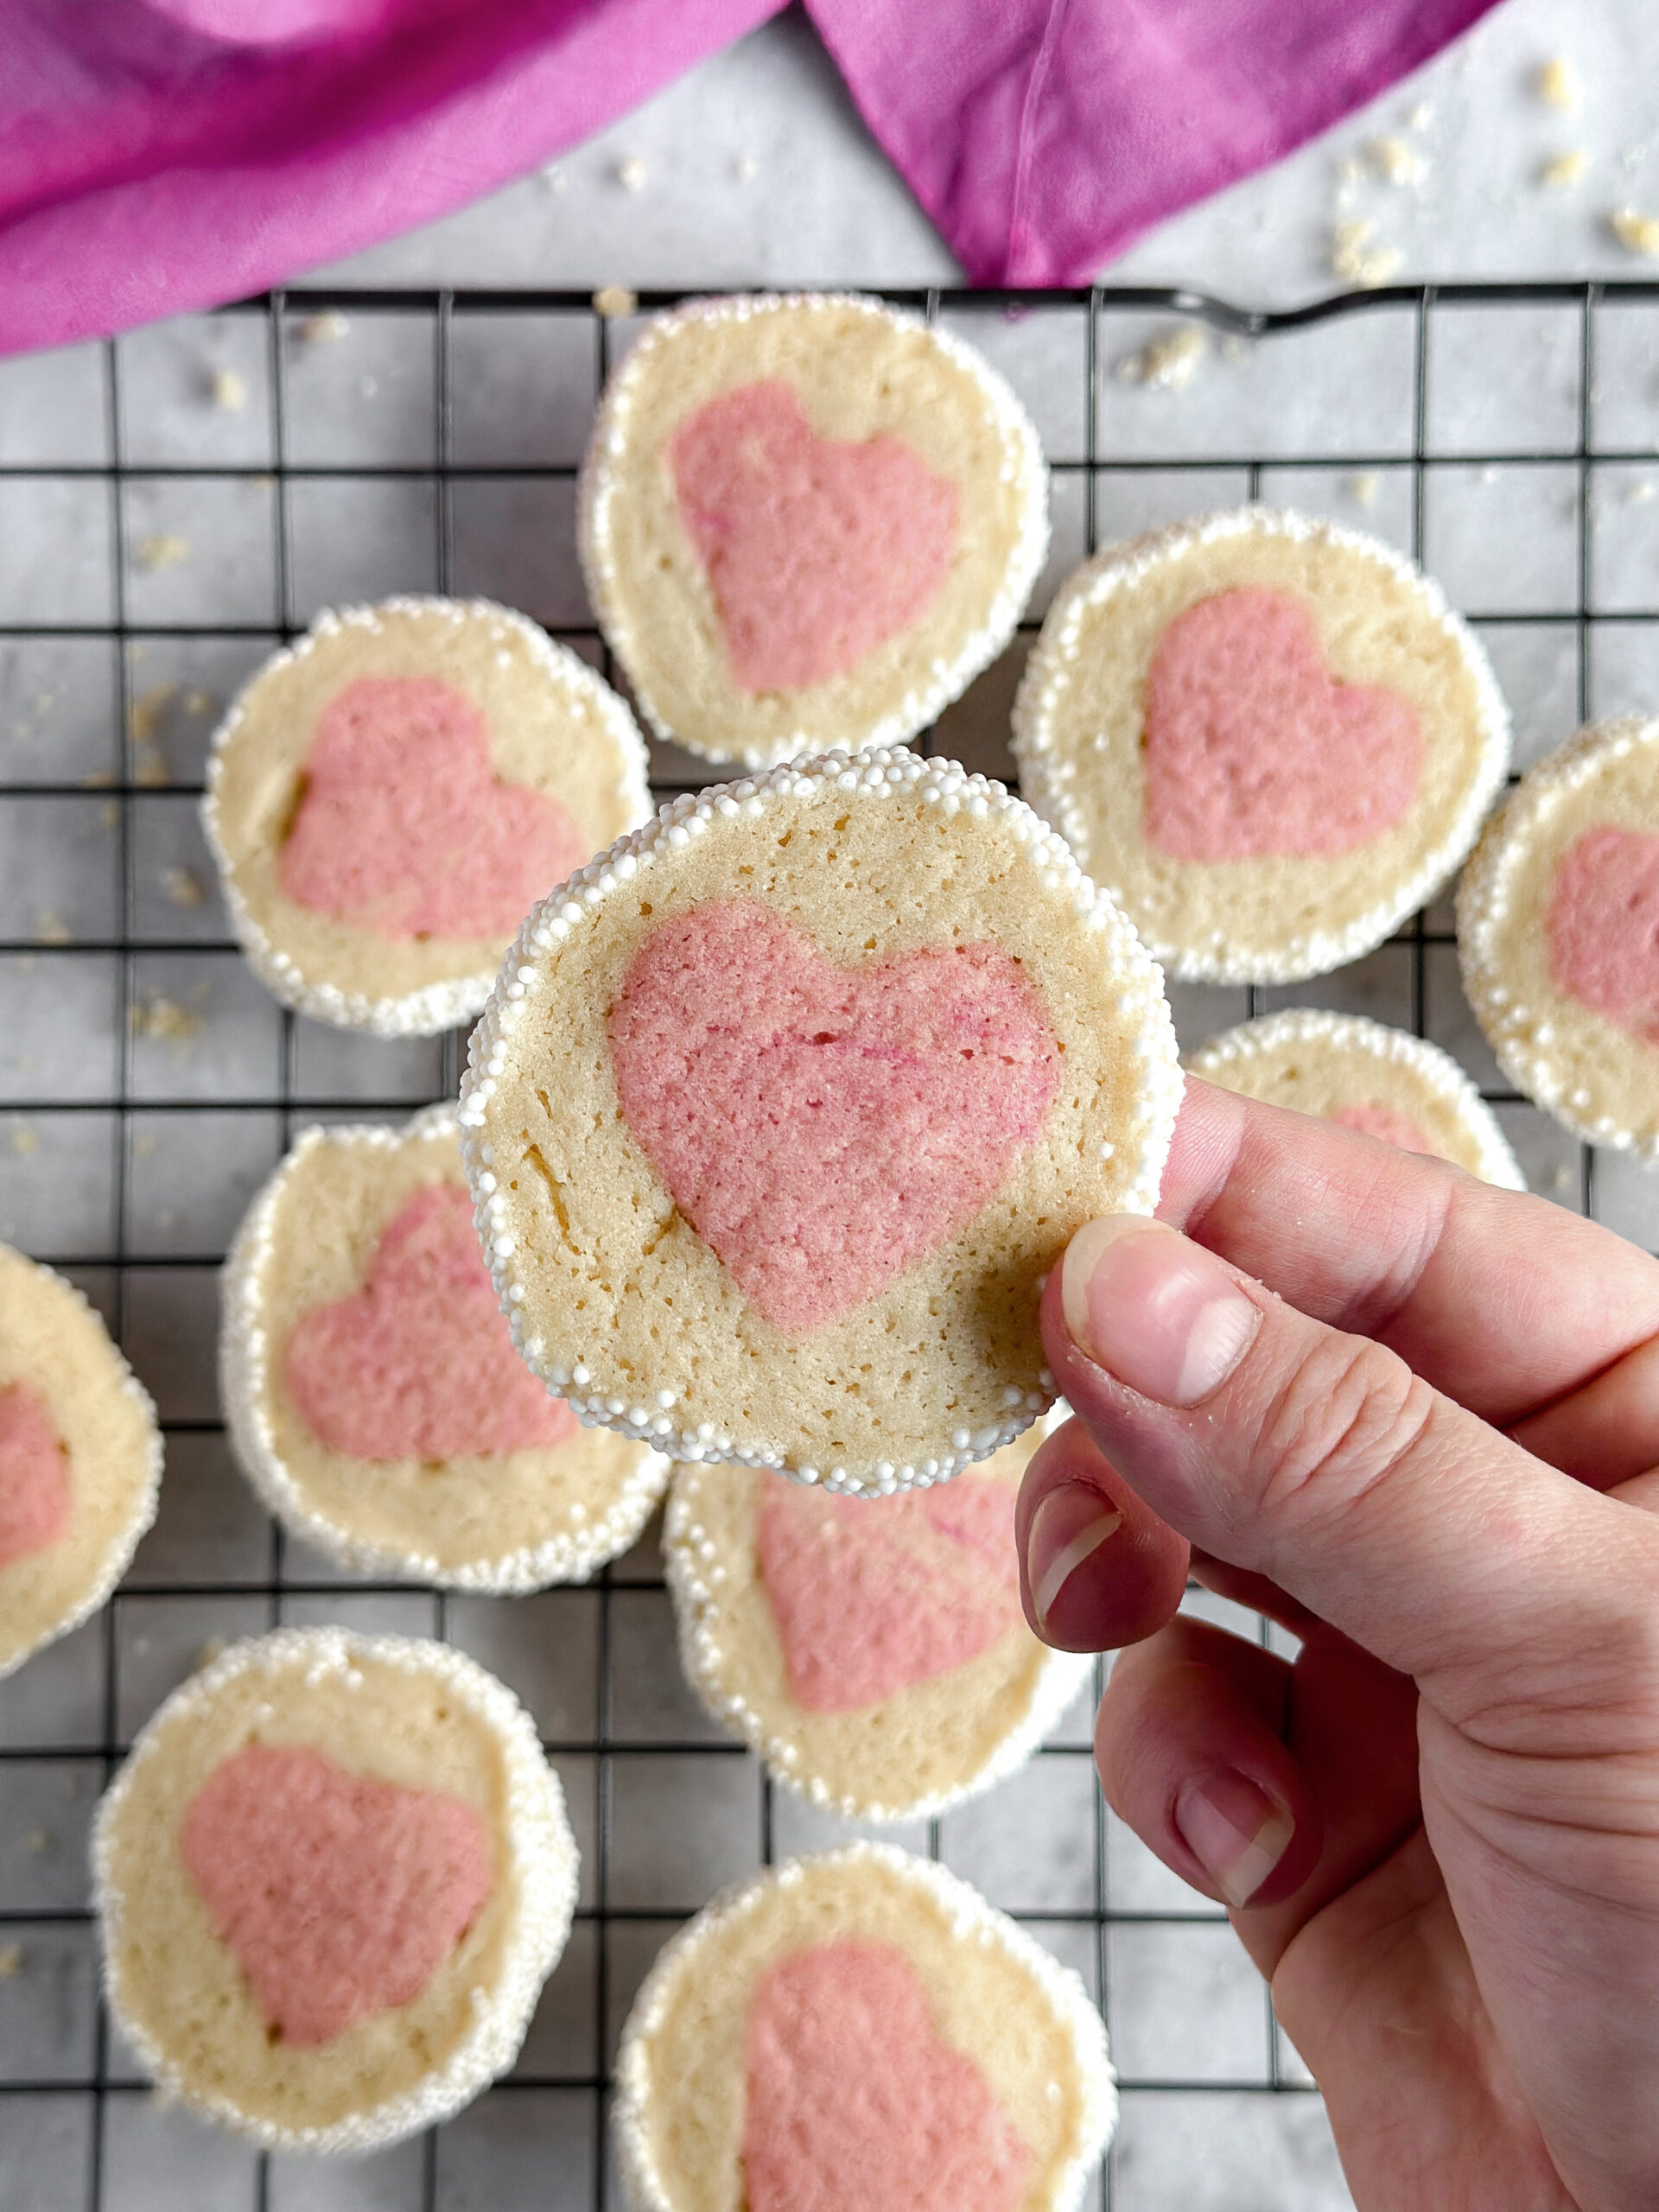
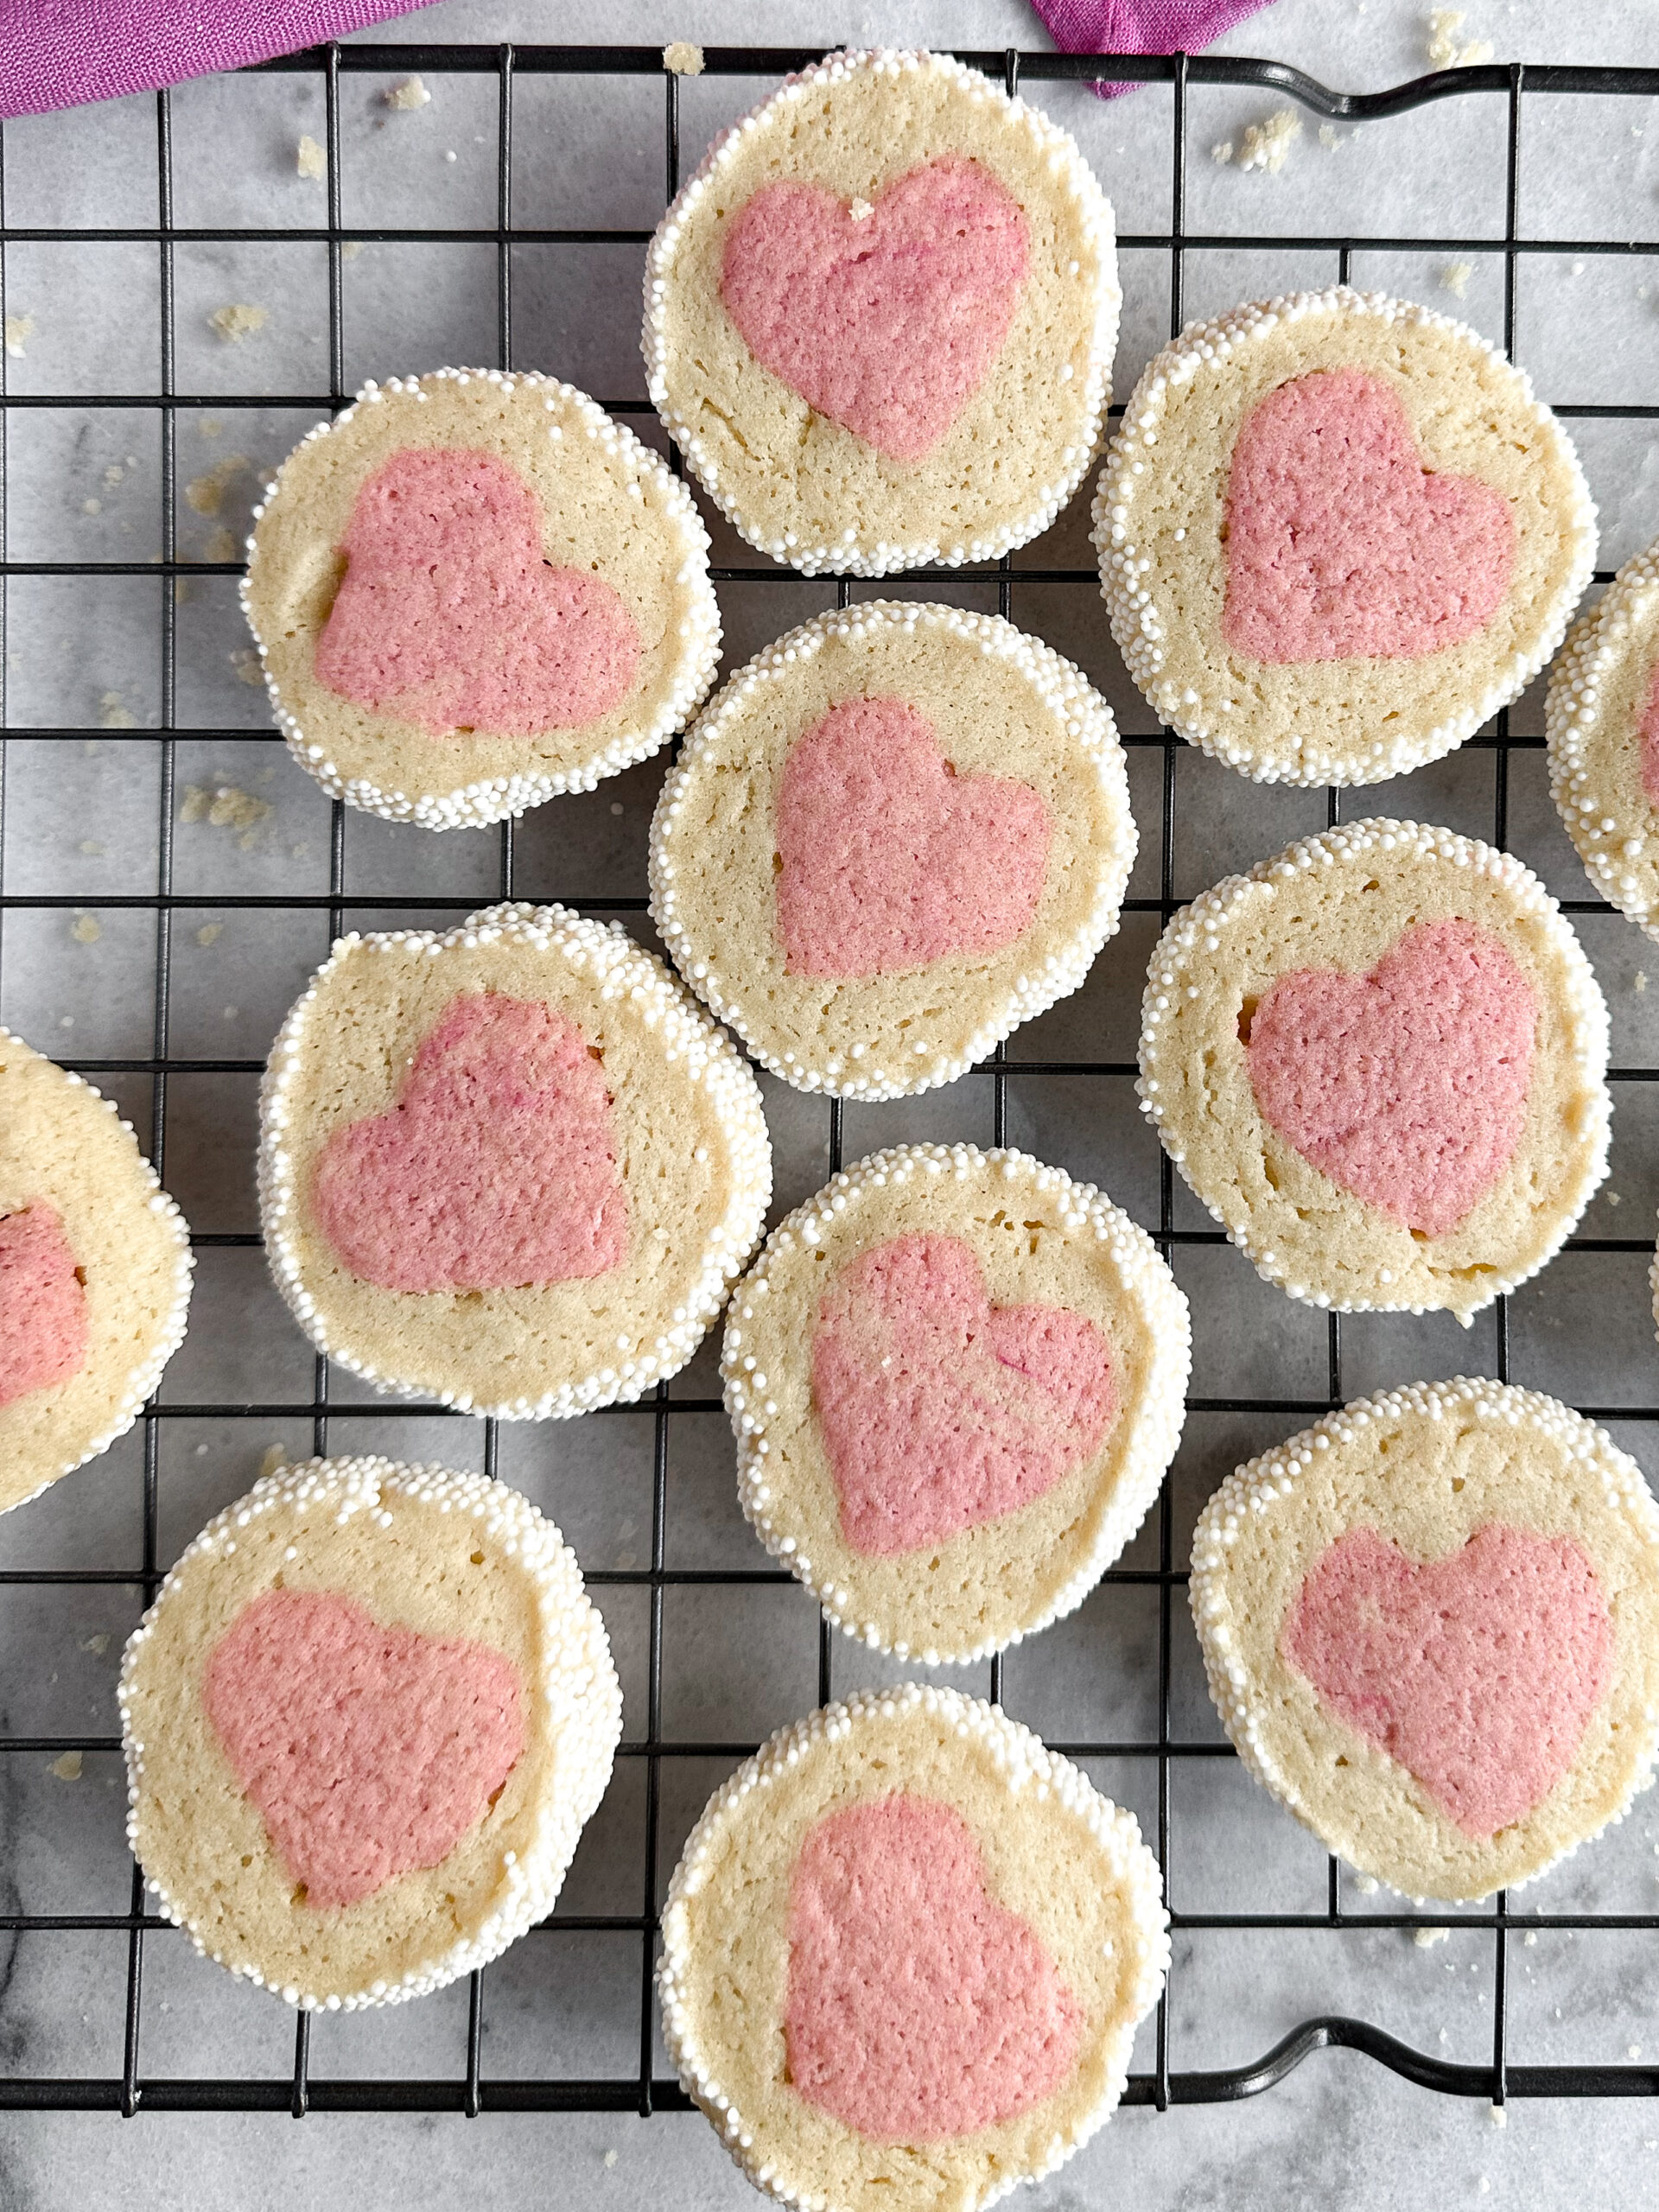
Pillsbury who? These slice and bake sugar cookies are perfectly soft and sweet with a touch of vanilla.
why you’ll love valentine slice and bake sugar cookies
- These are a bit of upfront work, but they are great to keep in the fridge or freezer in the shape of a log ready to slice up whenever you’re ready.
- They taste amazing and are the perfect soft texture with crispy, crunchy edges from the nonpareil sprinkles.
ingredients in valentine slice and bake cookies
- unsalted butter– If all you have is salted butter, it’s absolutely fine. If you are sensitive to salt, remove ¼ teaspoon of salt from the recipe. *You want the butter to be room temperature. If your butter is cold, put it in the microwave for three seconds, flip them, and microwave it again for another three seconds. Keep doing this until the butter is pliable. I keep my butter in the paper for this. Just be careful not to melt them or get them too soft.
- granulated sugar– For sweetness and to help achieve a soft texture with crisp edges.
- Diamond Crystal kosher salt– I highly recommend grabbing a box of this salt here. It is the best salt for cooking and baking. However, if all you have is table salt, divide the salt in the recipe by half. (For this recipe, you would use ½ teaspoon of regular table salt rather than 1 teaspoon of Diamond Crystal kosher salt.)
- vanilla bean paste– You can absolutely use vanilla extract if that’s all you have, but the flavor of vanilla bean paste is incredible and adds a bigger punch of vanilla than regular extract. Not to mention the added bonus of pretty speckles of vanilla bean caviar. I use vanilla from here and here and here.
- almond extract– I know this is a polarizing ingredient, but I love it so much. If you love it too, add some to your cookies. If you hate it, leave it out.
- egg– for a soft, tender texture
- all purpose flour– I use King Arthur
- cornstarch– to make our cookies even more tender
- baking powder– for a bit of lift
- gel food coloring or natural food coloring– to color the center core of the cookies (I used Americolor gel food coloring.)
- white nonpareil sprinkles
supplies needed to make valentine slice and bake sugar cookies
- stand mixer or hand mixer
- mixing bowl (if you’re using a hand mixer)
- spatula- for scraping down the bowl
- scale (trust me, it will make everything easier)
- parchment paper– for baking and rolling the cookies
- baking sheets, two
- large knife, like a chef’s knife– to slice the cookies
- tiny heart cookie cutter
how to make valentine slice and bake cookies
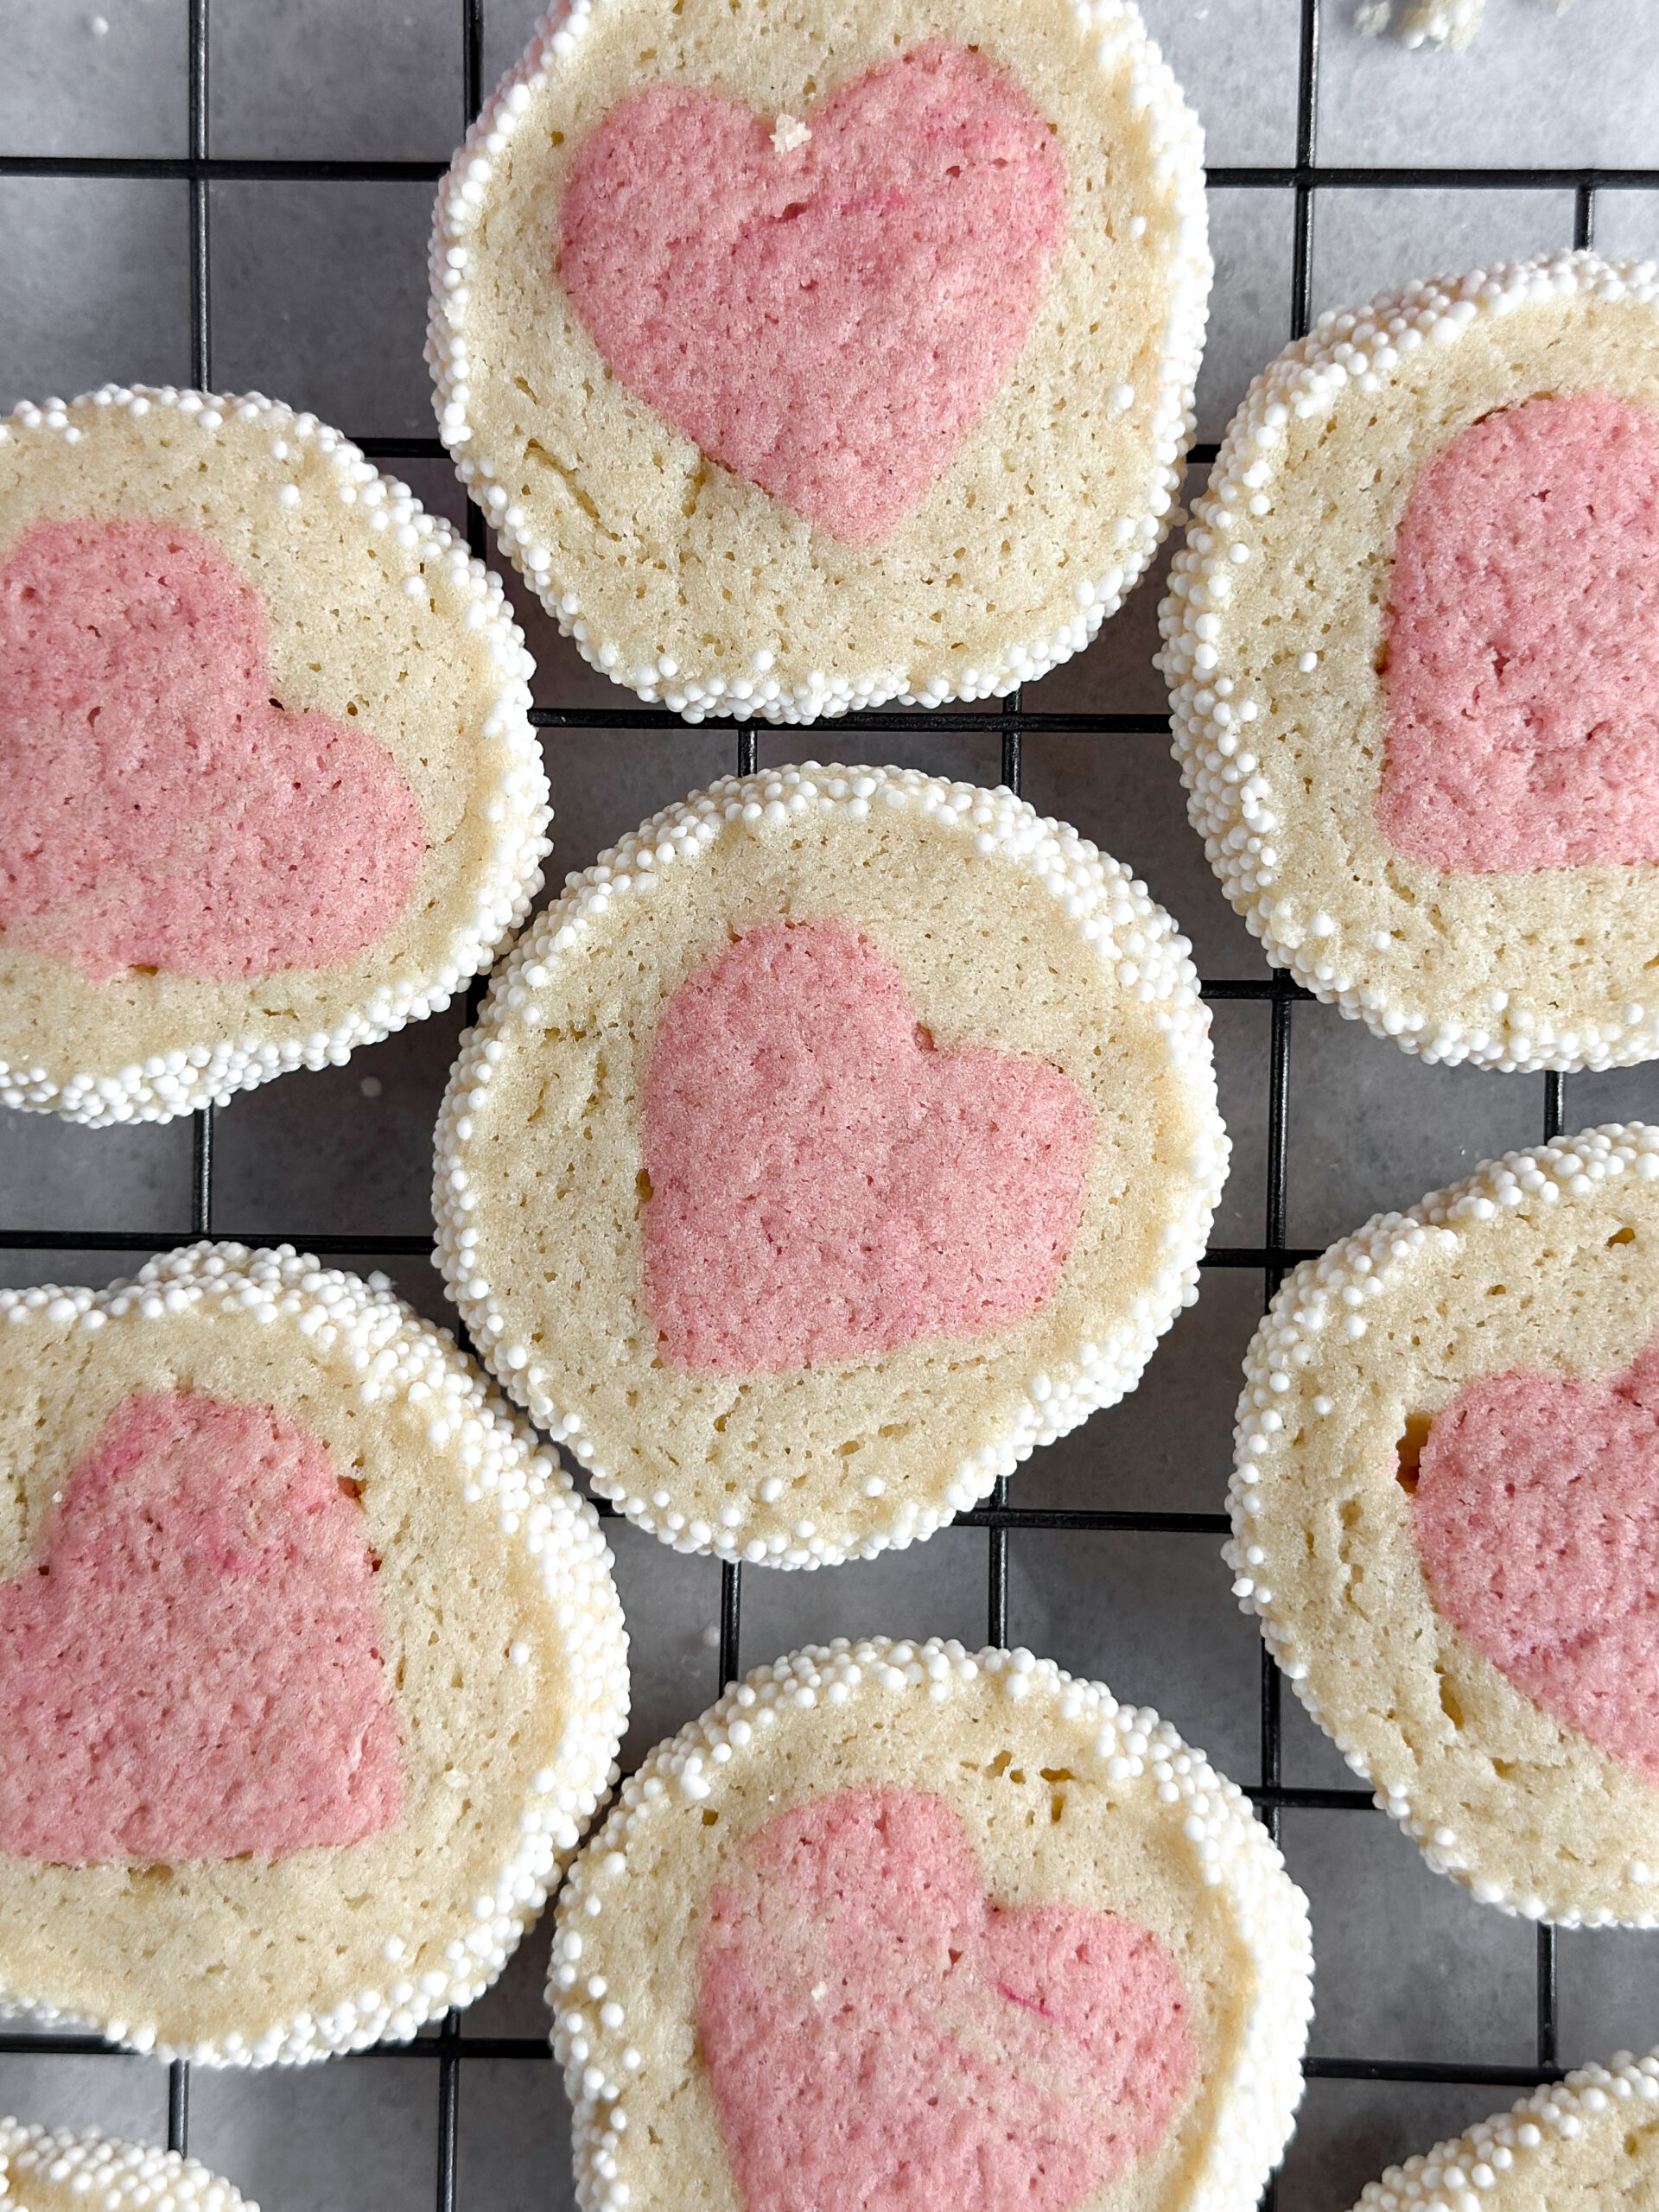
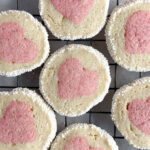
These slice and bake sugar cookies are perfectly soft and sweet with a touch of vanilla. They are an easy to make sugar cookie dough that is divided to make a colored and shaped core inside a log of dough. Once cut, the shape inside is revealed. You can use natural food coloring for this if you’d prefer, but make sure you use a thick gel coloring rather than a liquid food coloring.
Start by creaming together the butter, sugar, and salt in a mixing bowl. Add the egg, vanilla extract, and almond extract and mix until emulsified.
Add the flour, cornstarch, and baking powder and mix just until combined and there are no clumps of flour or butter.
If you have a scale, weigh the dough. Mine weighed 650g. Divide the weight of your dough by three, and put one third of your dough back into the mixer. (I put 217g of dough back into the mixer.) Set aside the two thirds weight of dough.
Add a couple drops of pink or red gel food coloring to the dough in the mixer and mix on low until combined. You may need to gently knead the dough by hand or with a spatula to evenly distribute the color while not over mixing the dough and causing it to become tough.
Drop your now pink dough onto a lightly floured sheet of parchment paper. Lightly flour the top of the pink dough and cover with another sheet of parchment paper. Roll into a thick, even layer of dough, about ⅜″ or ½″ thickness. It really helps to have a guided rolling pin. Freeze the sheet of pink dough for five minutes.
Use a tiny heart cookie cutter to cut out several hearts from the dough. Re-roll the scraps and cut again until there is no dough left. If the dough is too sticky, freeze for five minutes before cutting hearts again.
(Don’t worry if your hearts get a bit misshapen. It’s going to happen because we are not chilling the dough. When we press them all together, they’ll be fine.)
Stack all of the hearts together, making sure to line them up properly. Use your fingers to gently press and smooth the sides of the heart “log” to shape them and adhere them together.
Roll a snake of plain dough and press it into the divot of the heart log. Continue adding flat pieces of plain dough all around the heart log until it is evenly covered.
Roll the log to smooth it. Place the log onto a piece of parchment paper the long way and wrap the paper around once to meet the parchment. Gently squeeze the dough. log from the center out to carefully stretch and lengthen it. Once it is about 10″-11″, roll it until it is smooth. The log will end up being about 12″. It is okay if your log is a bit thinner or thicker.
Wrap the log in parchment paper and then wrap it again in plastic wrap so it is secure. Refrigerate for at least two hours or overnight. You could also freeze it for up to three months.
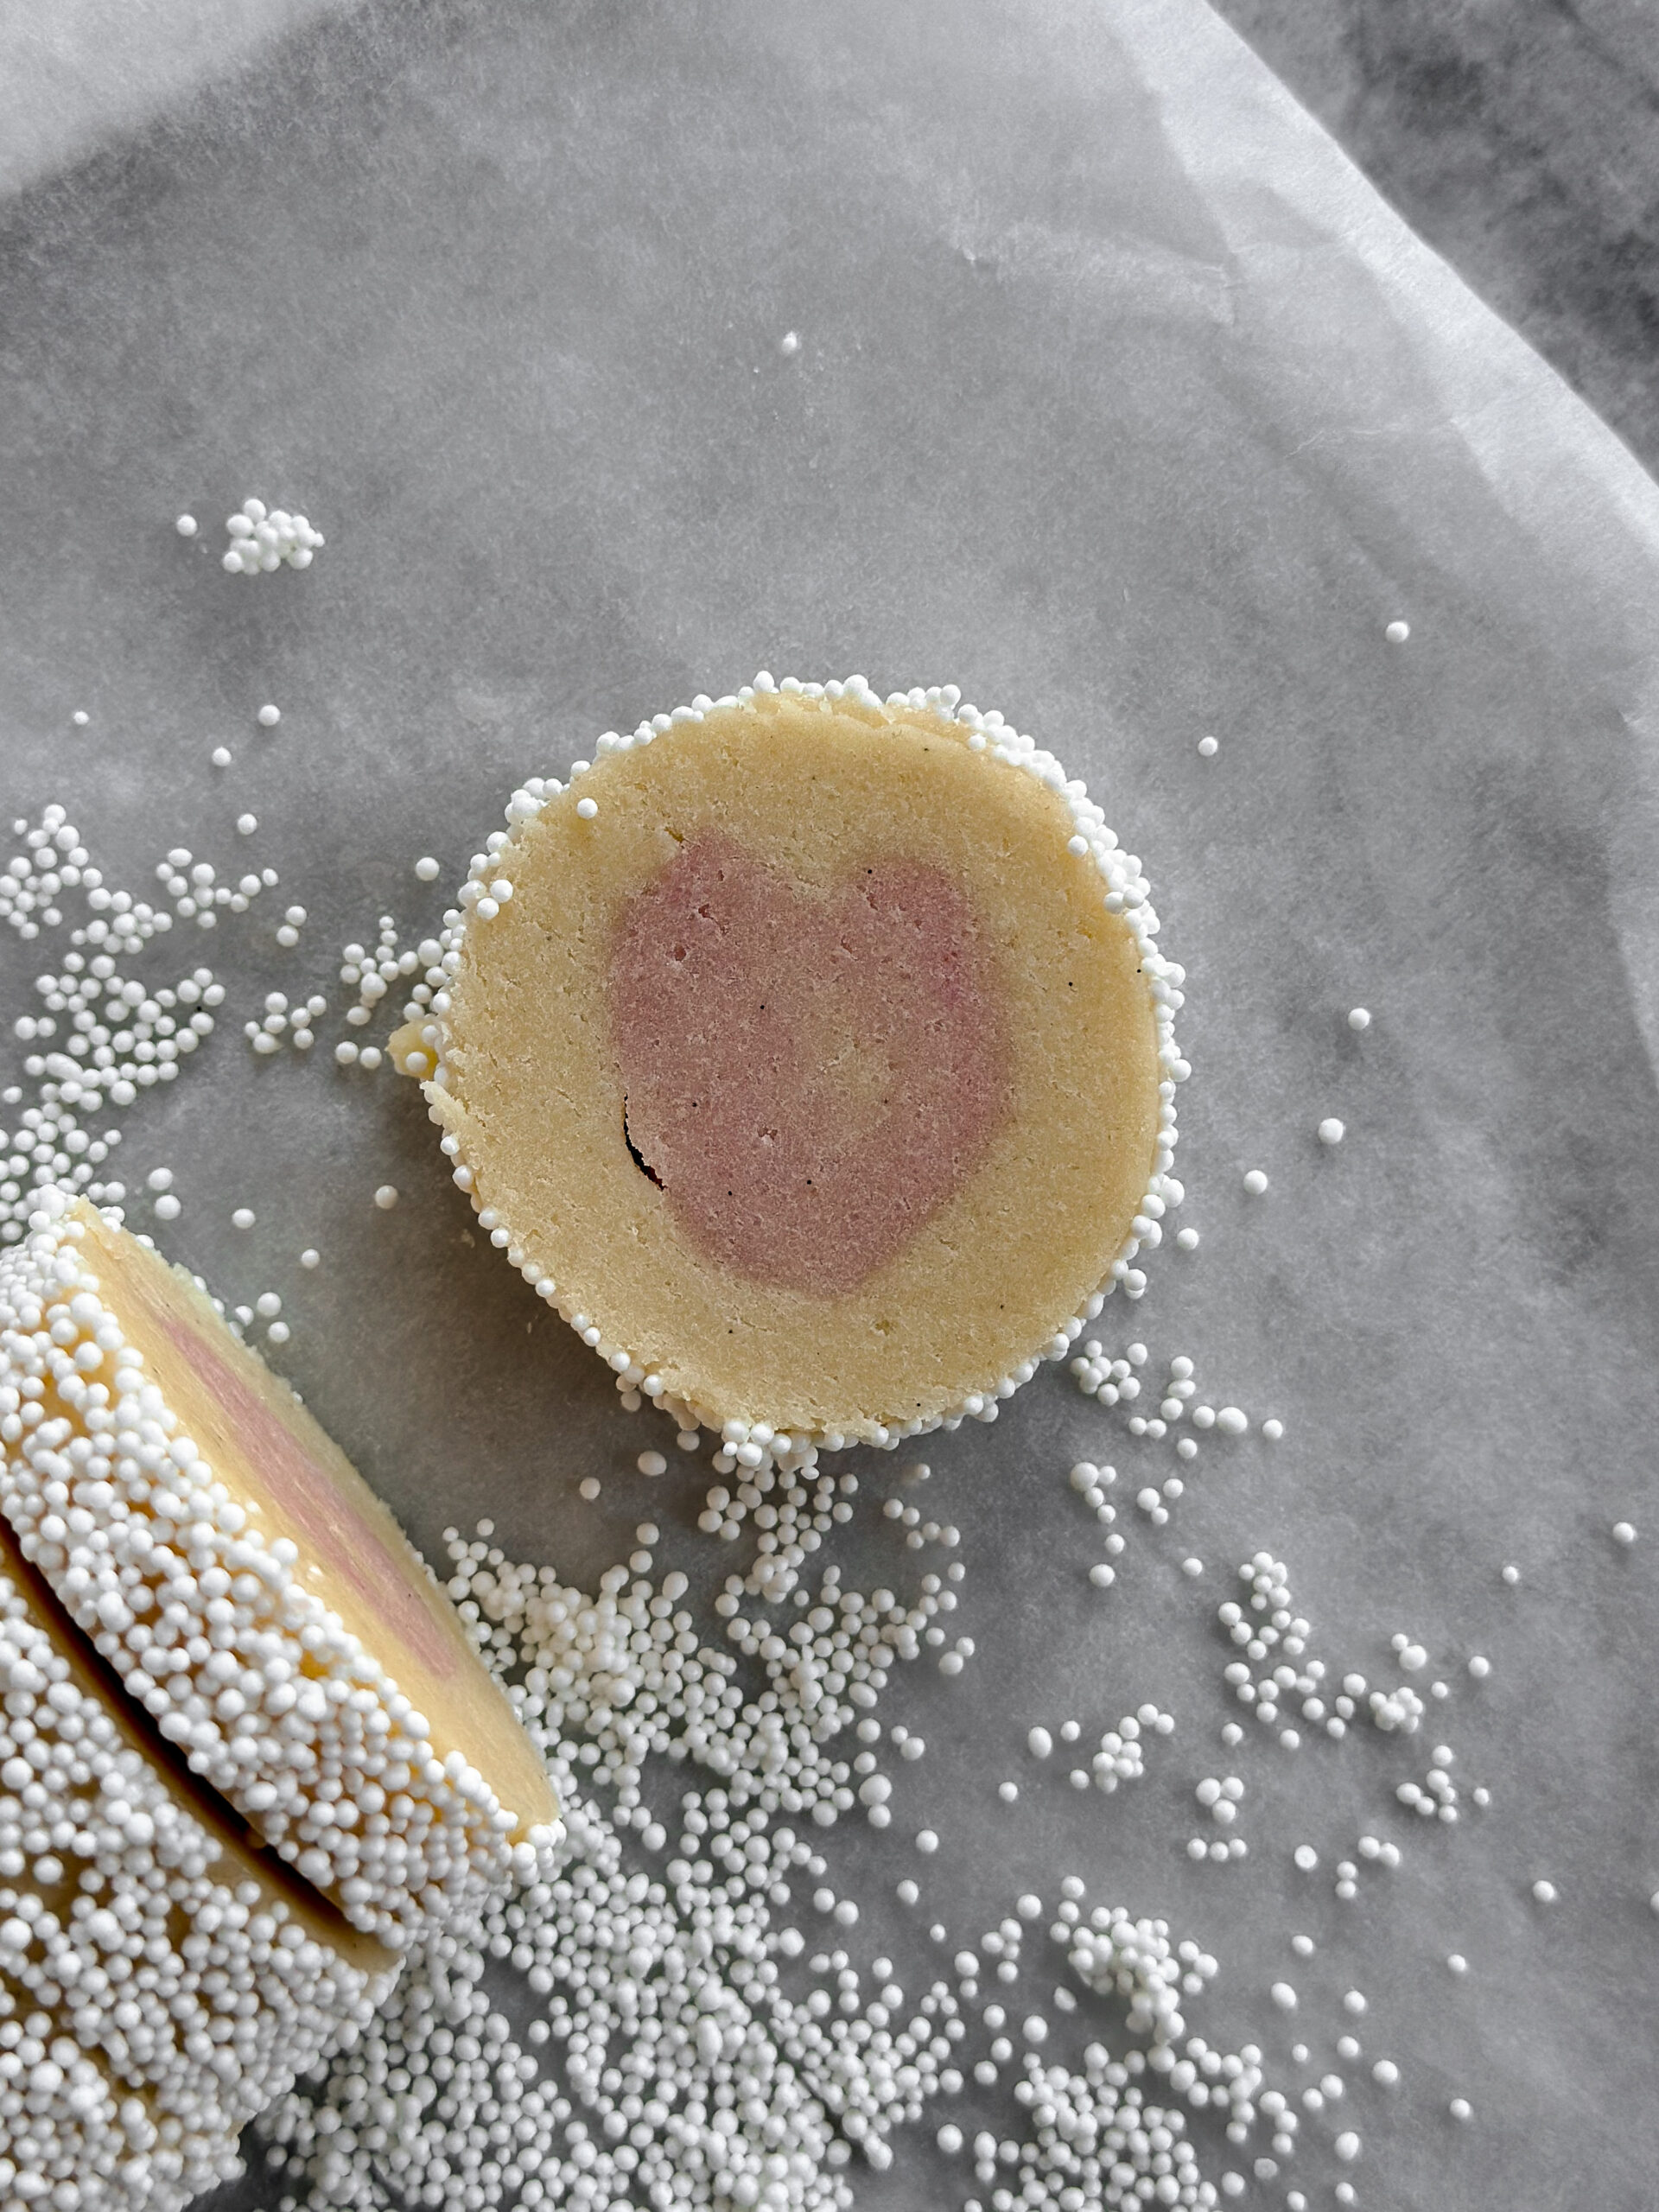
Once the dough log has chilled, roll the log in white nonpareil sprinkles to coat.

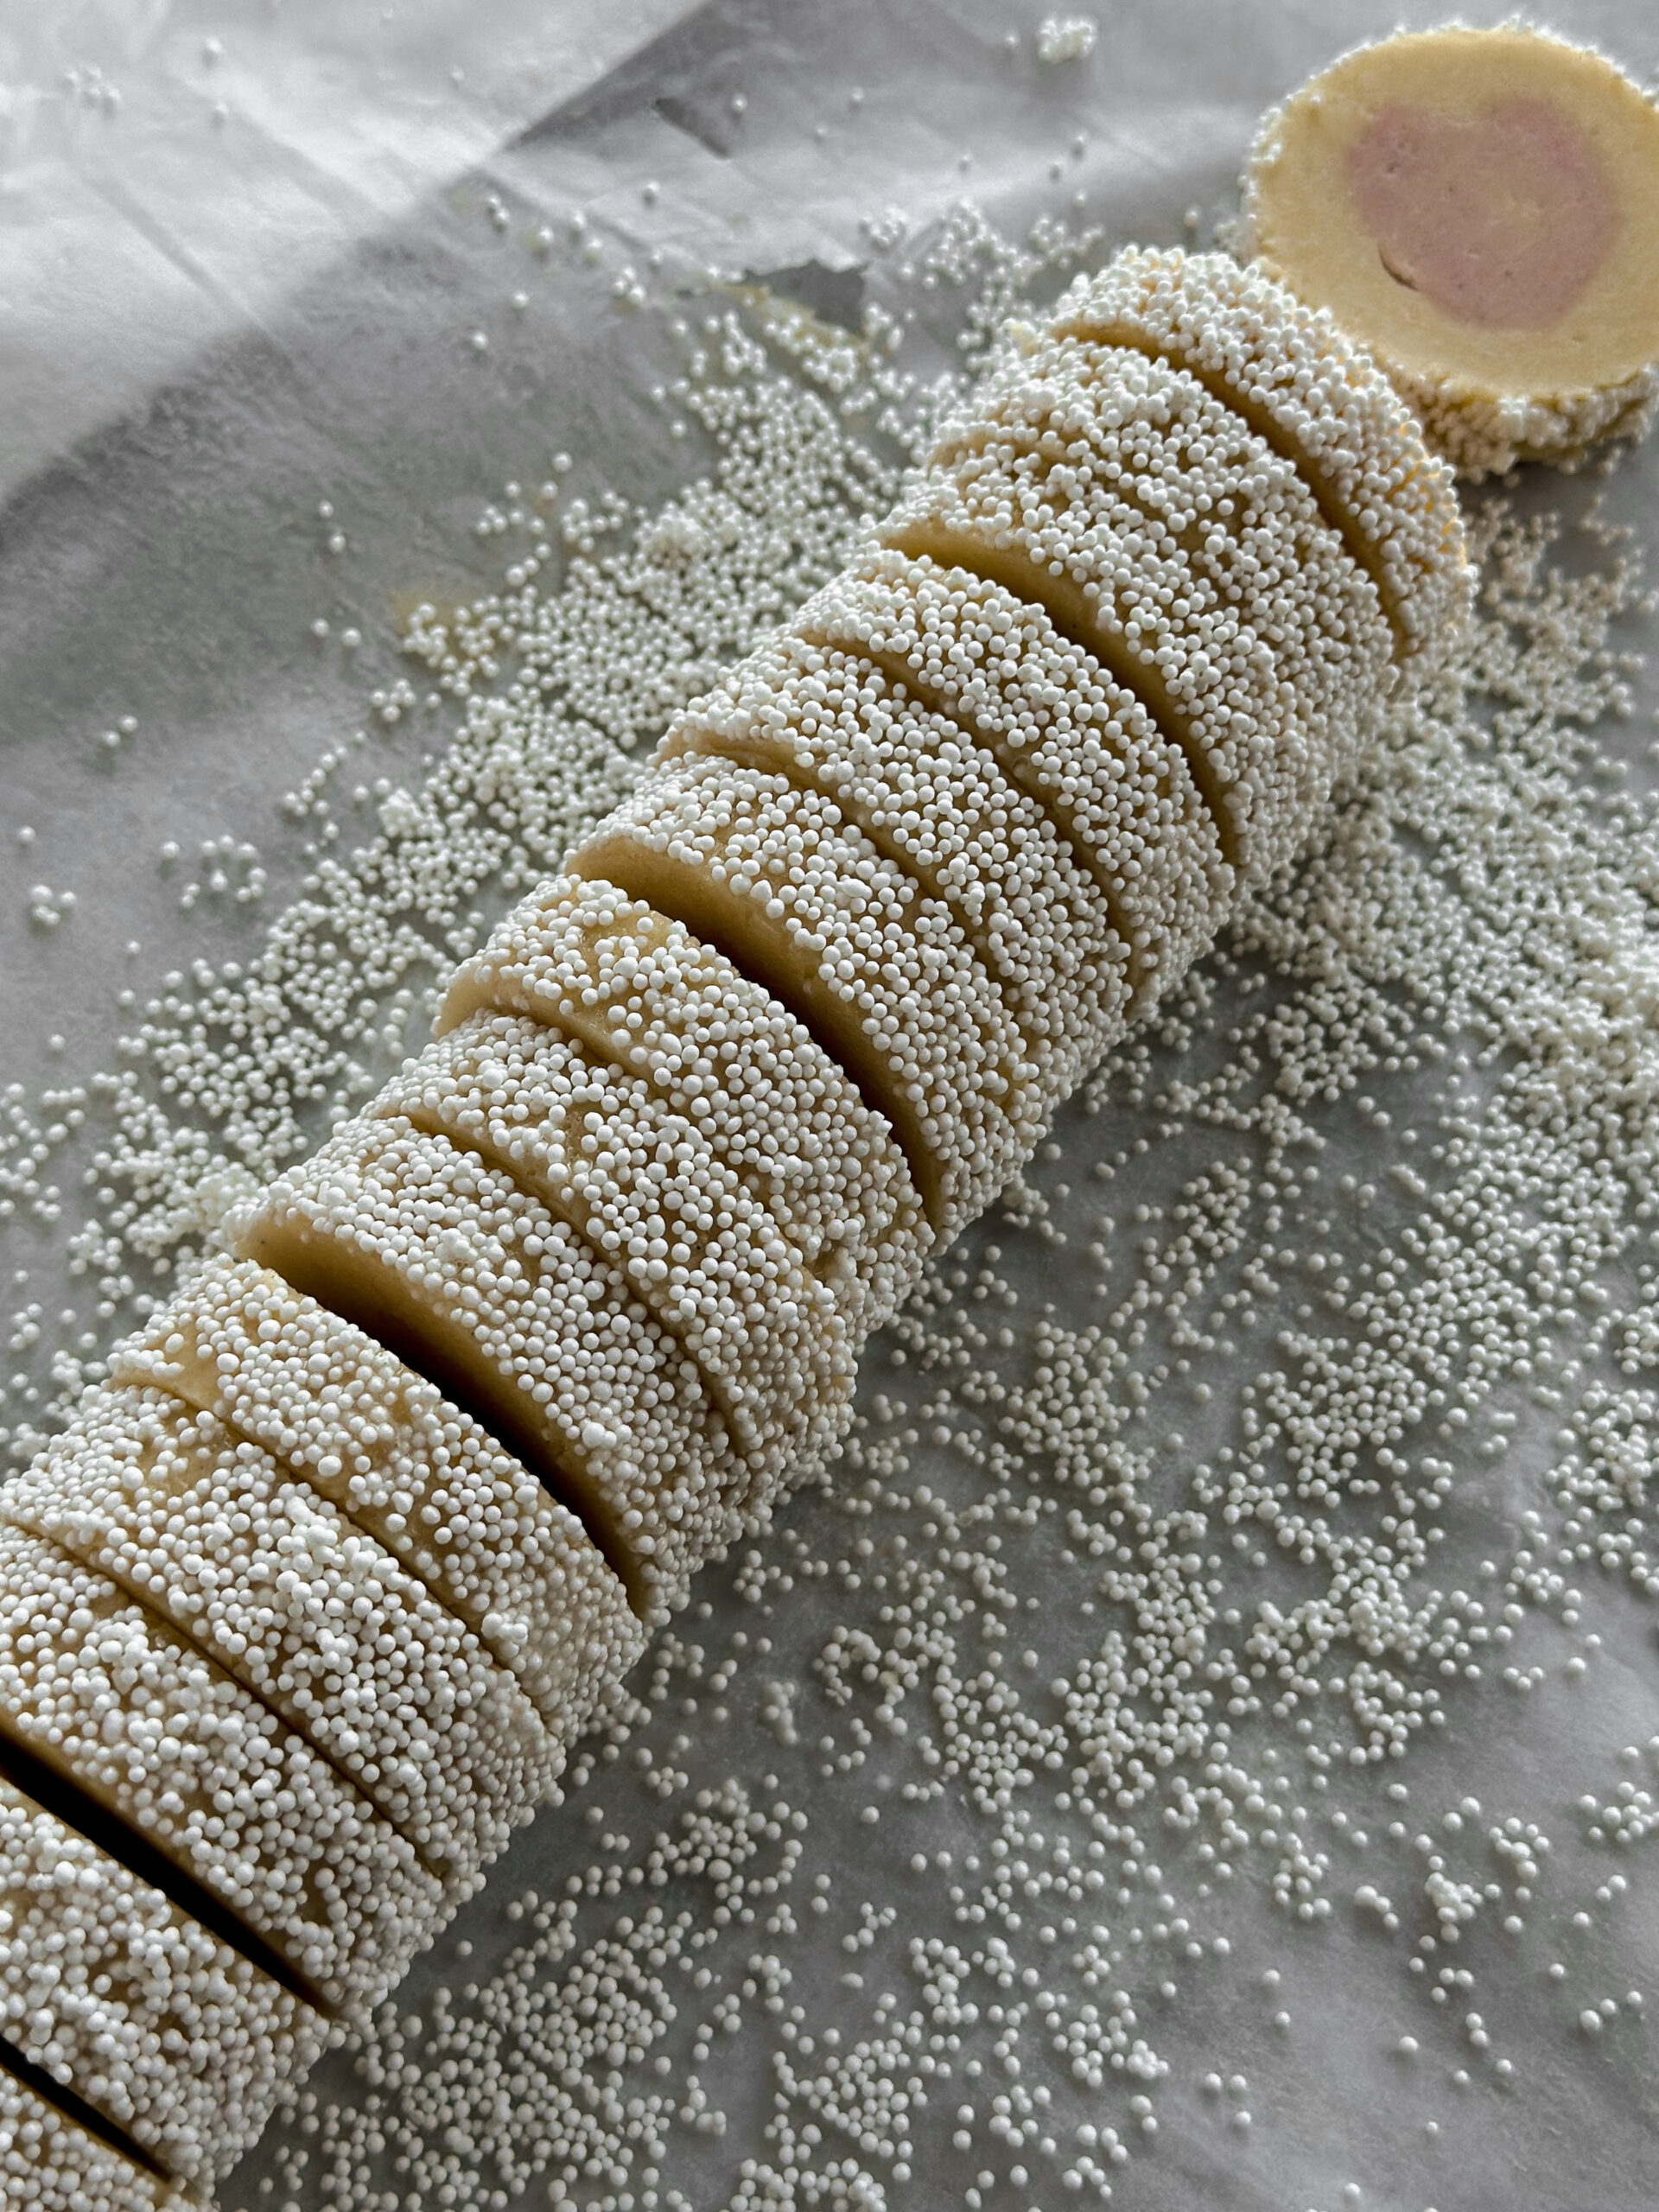
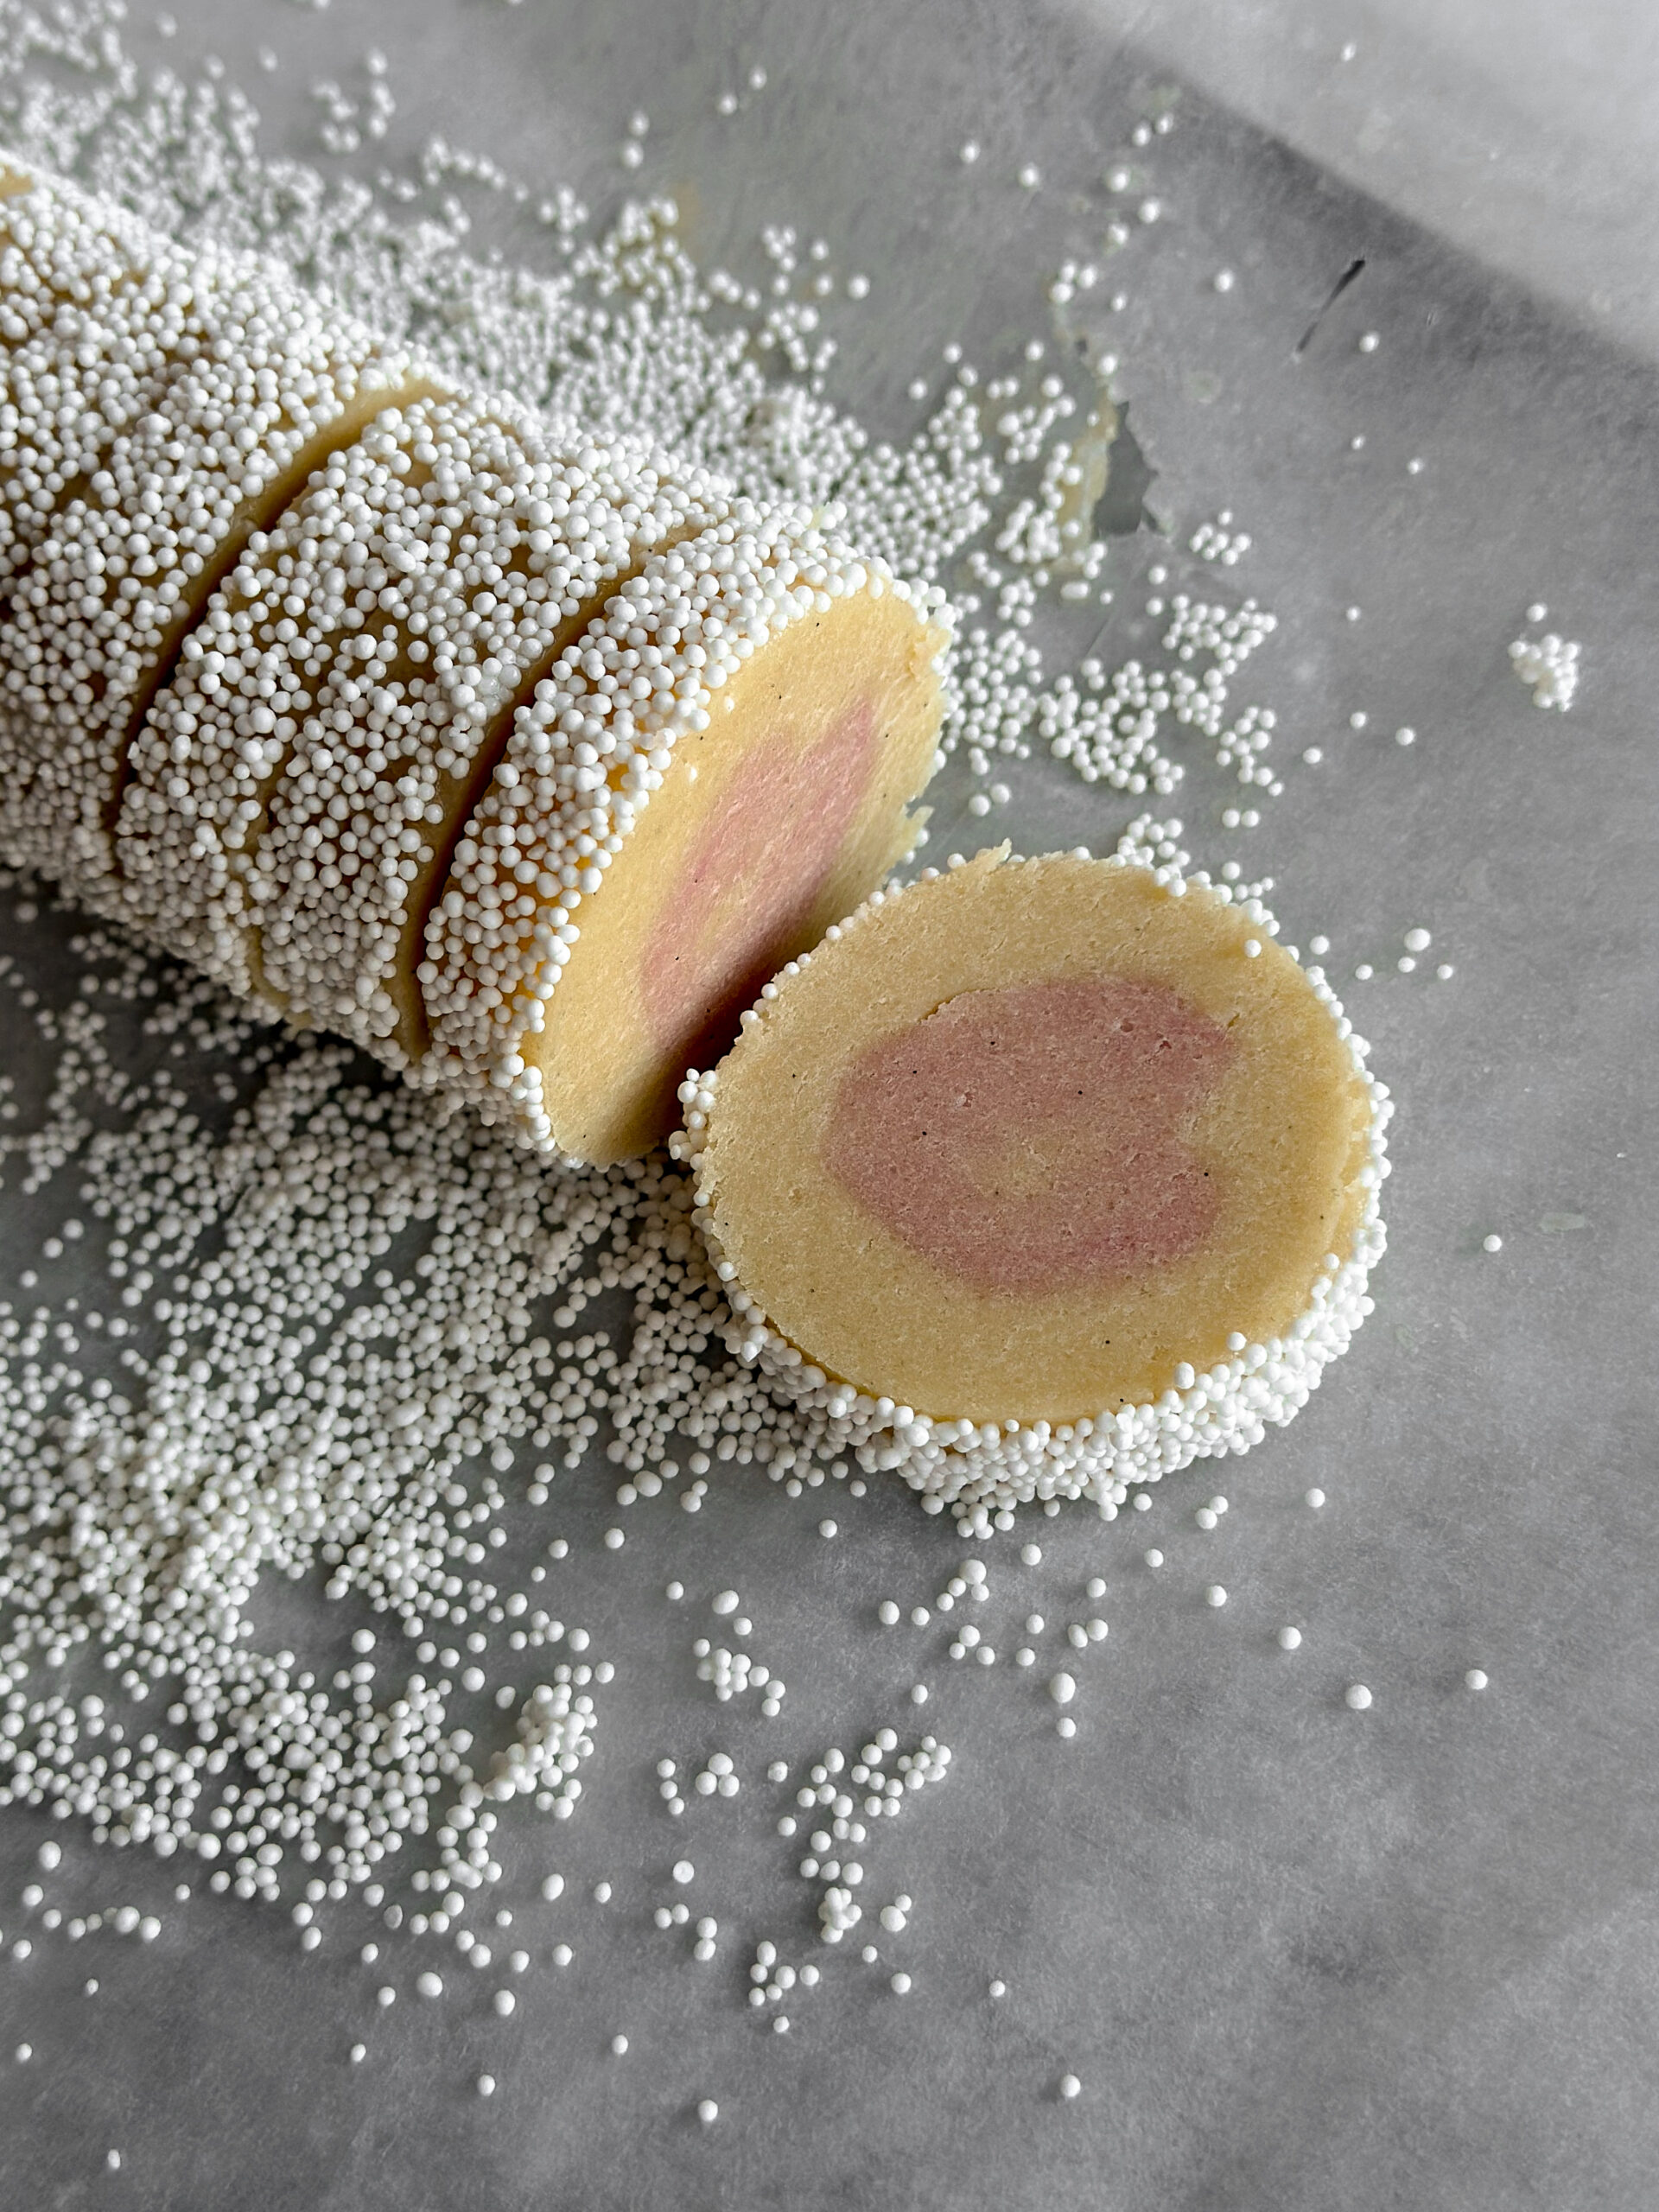
Evenly slice the log of dough in ½″ slices. (This may seem thick, but they spread in the oven, which thins them out significantly.)
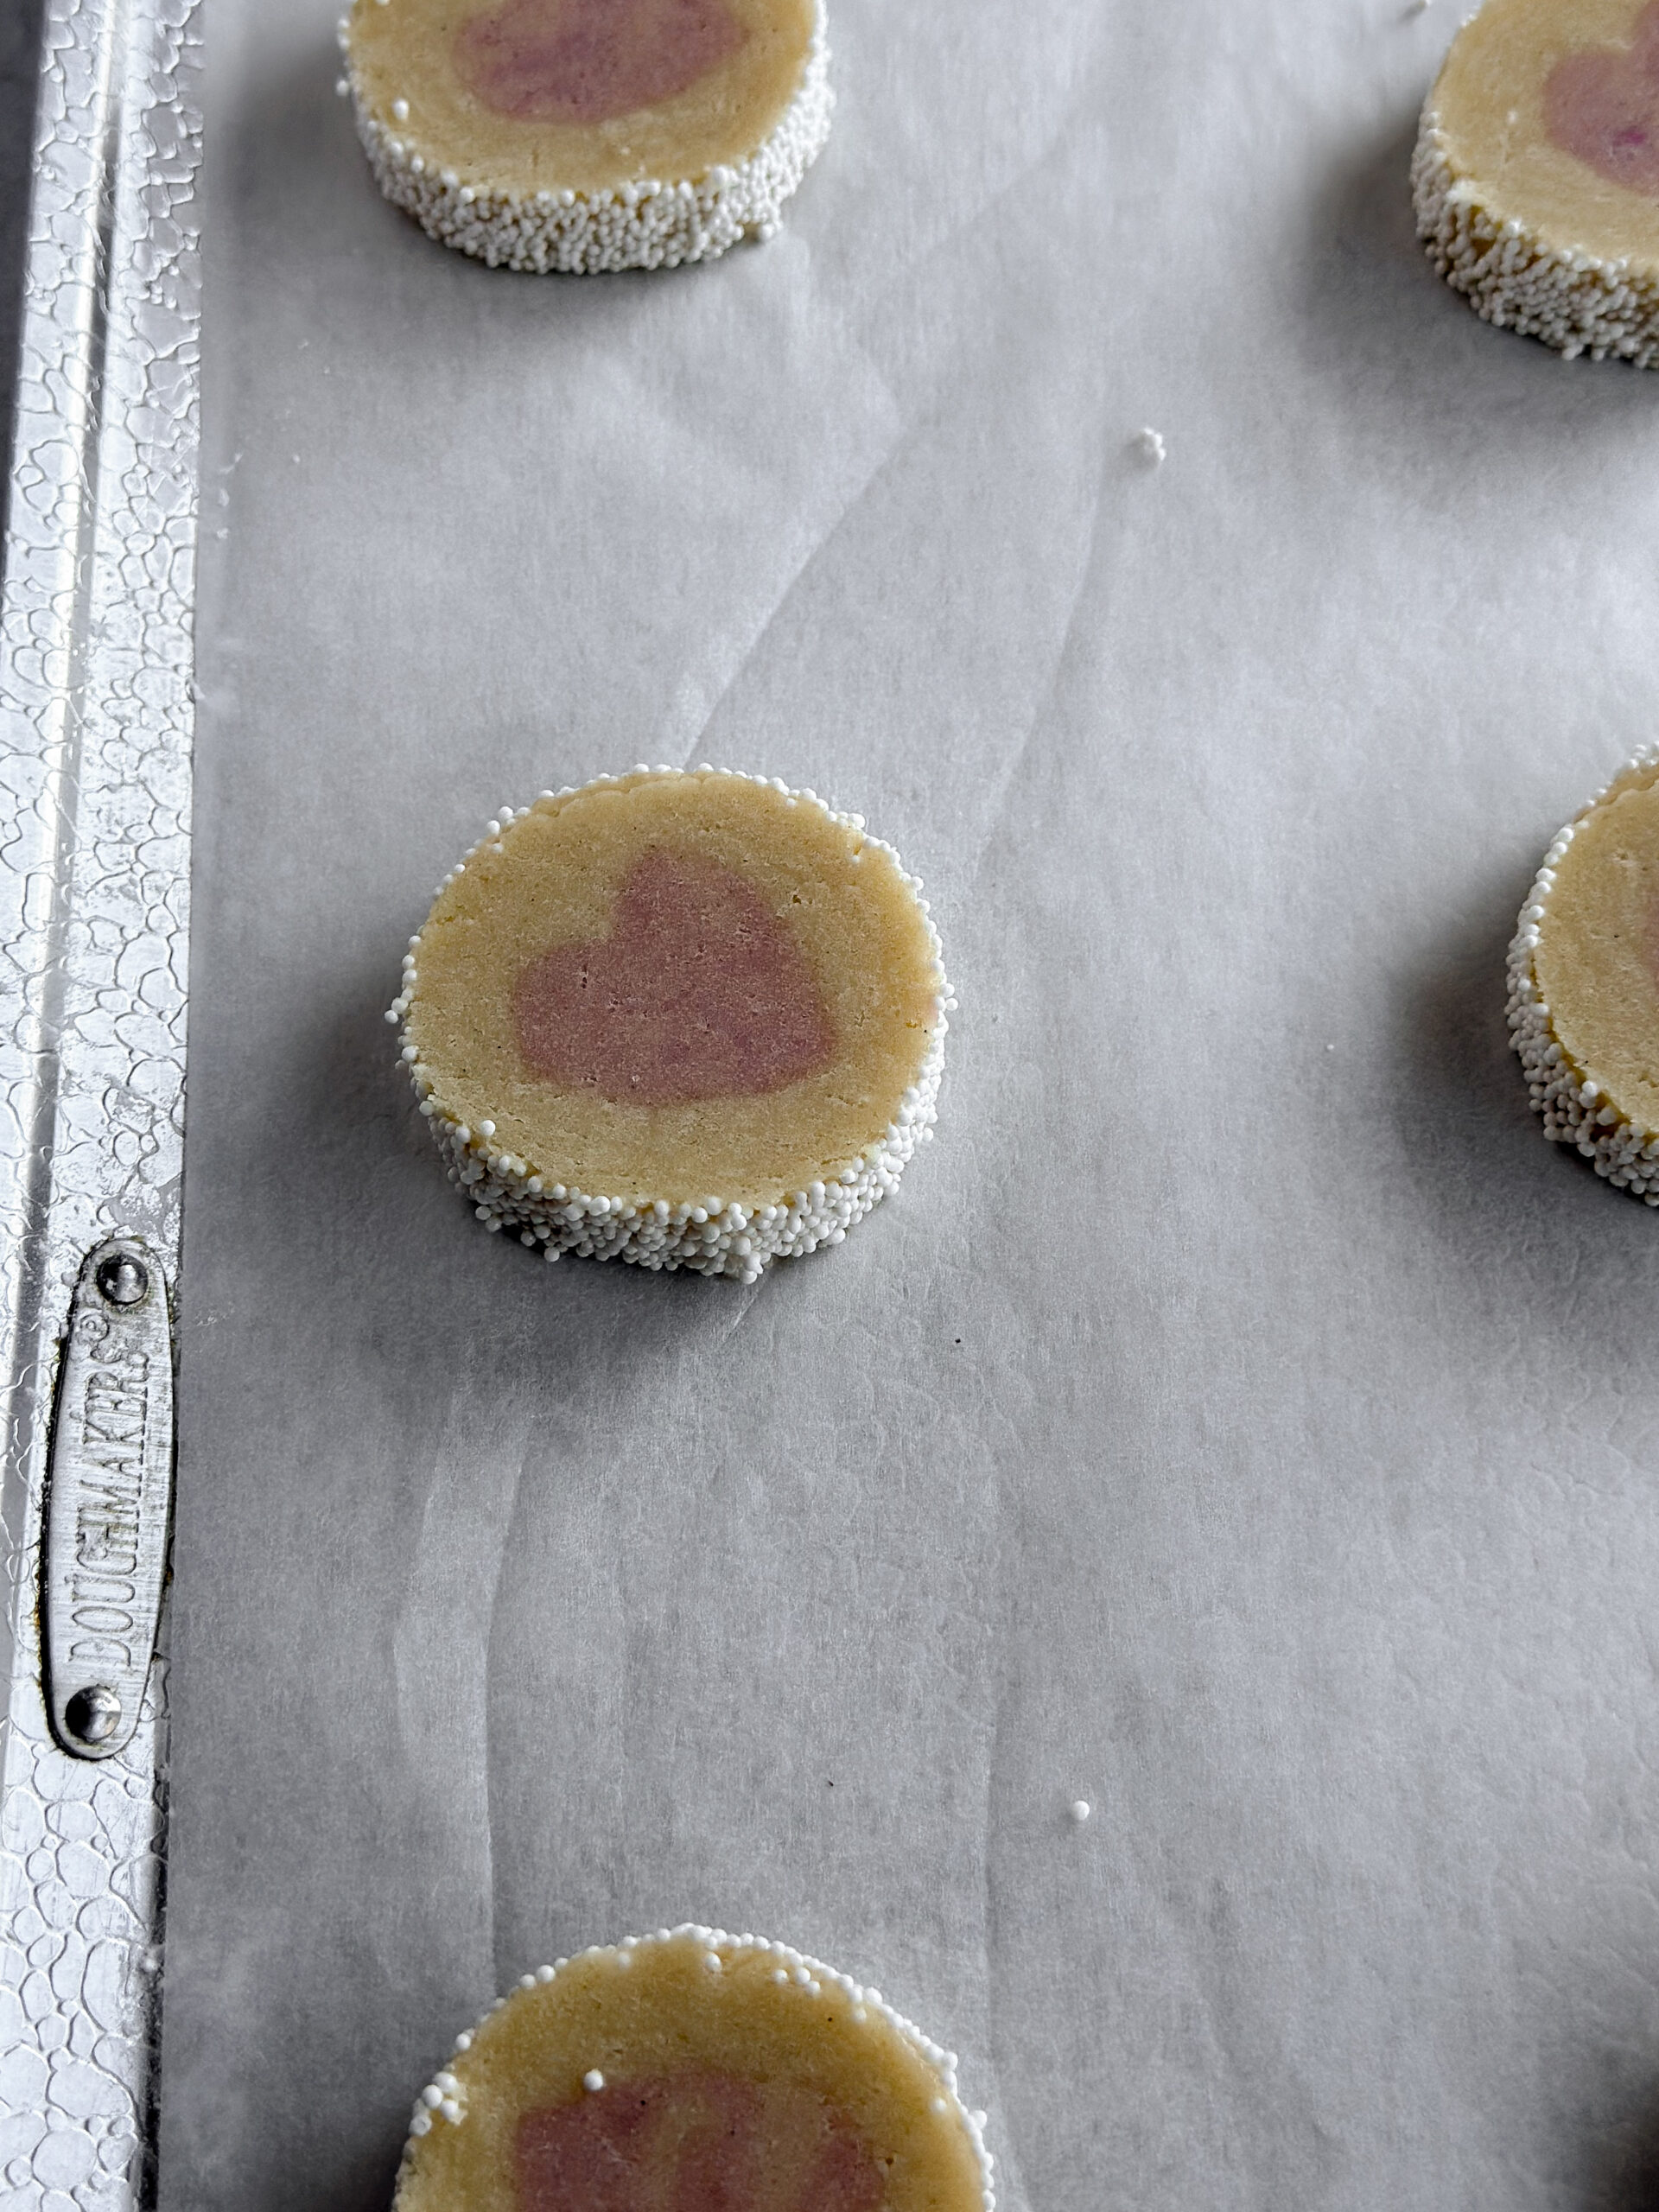
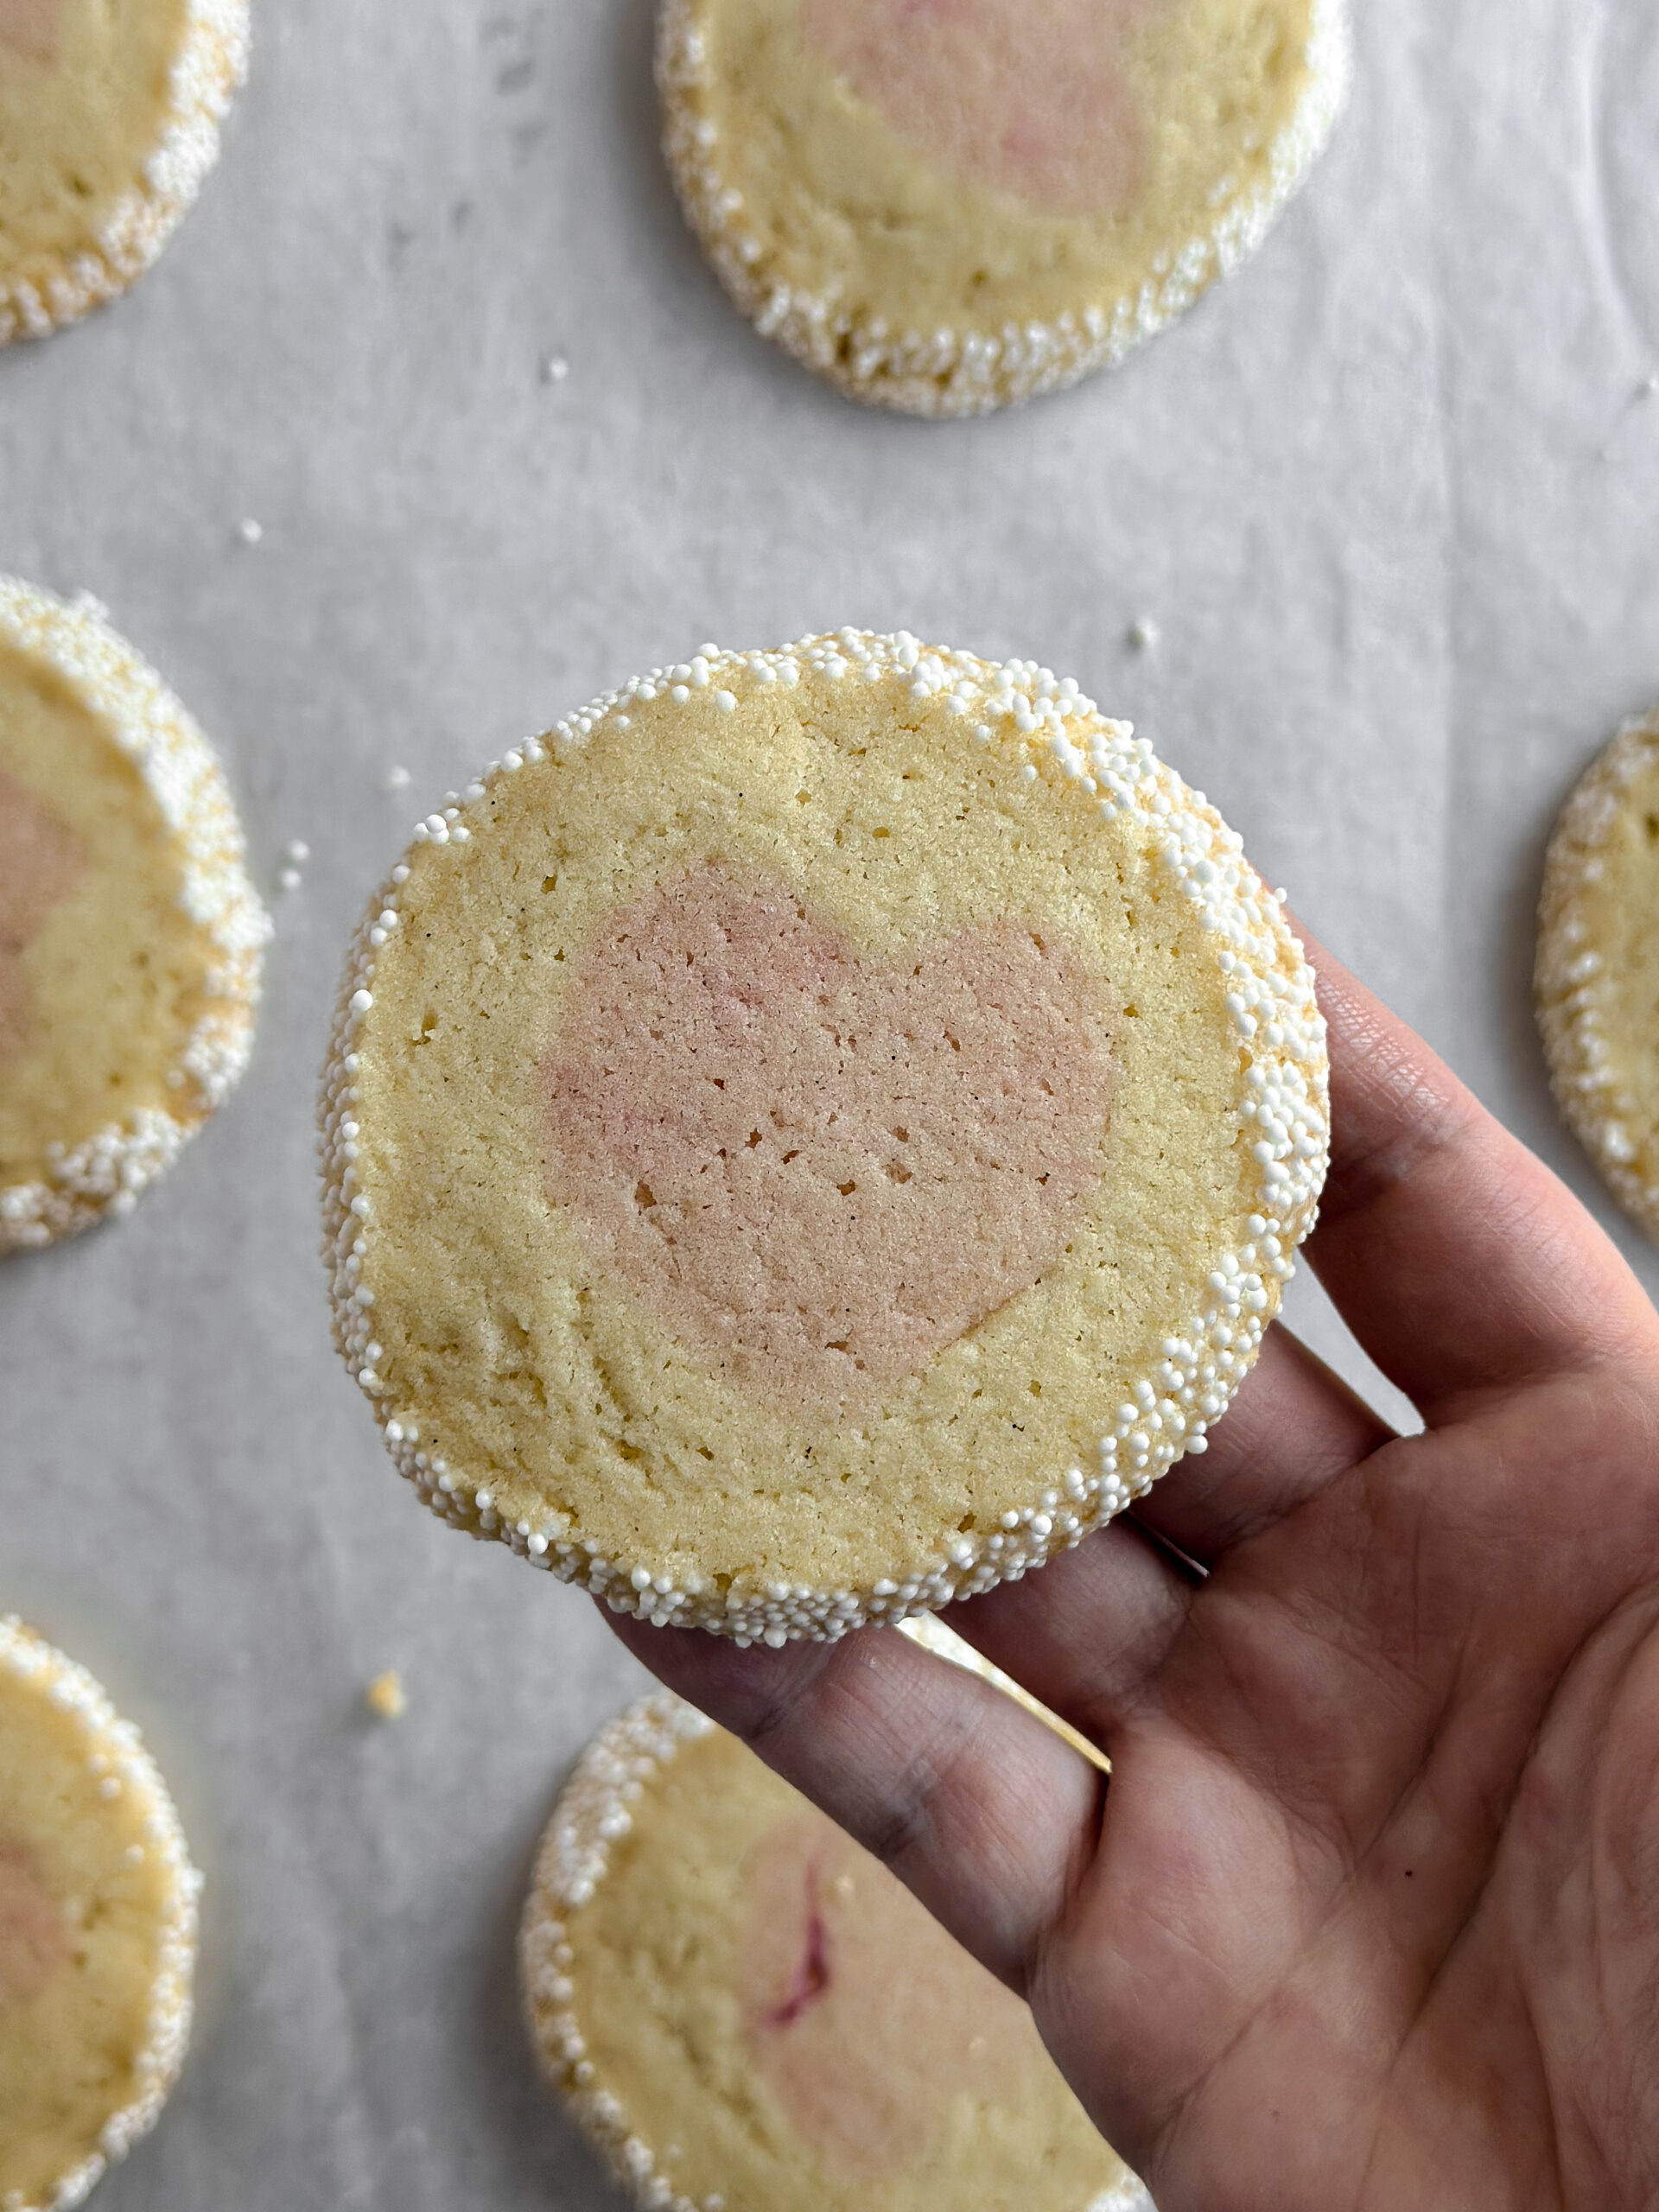
Bake the cookies at 350 F for 9-11 minutes or until the top of the cookie is no longer shiny. Do not over bake or they will not be soft. If you like a crispy, crunchy cookie, slice them at ¼″ and bake until they start to get golden brown at the bottom edge.
Cool the cookies on the pan for a few minutes before transferring to a wire rack to cool completely. This recipe will make about 20-24 cookies if you cut at ½″, depending on how long you roll your log.
success tips for making valentine slice and bake cookies
- I used Americolor fuchsia and Chefmaster Natural Pink in my testing. If you use natural food coloring, I would recommend using Natural Red because it would show up a bit darker.
- Color the center dough with pulverized freeze dried fruit dust like freeze dried raspberries or freeze dried strawberries. Start with a tablespoon and adjust from there.
- These taste amazing and can be made without a colored/shaped core. Just keep it simple and roll the plain logs in whatever sugar you like!
- Make sure to cut the cookies at ½″. Use a ruler as a guide. It might seem thick, but they thin out and spread a bit in the oven. They are a soft textured cookie, so the thickness helps achieve that.
- Mise en place’ is a French phrase with the idea of putting everything in its place before beginning to make a recipe. It helps everything to go smoothly and eliminates so much possible stress. Getting all of your supplies and ingredients together before ever starting the recipe will help tremendously.
- Weigh your ingredients, particularly the flour. It is the most important measurement in this recipe to weigh. Flour can be off in volume measurements by up to 30g, which is a quarter cup! Having incorrect flour measurements can cause your cookies to spread too much or, alternatively, be dry and crumbly. Weighing your ingredients makes everything so much easier, as you don’t have to wash all the measuring cups at the end. However, I do not use the scale to weigh out teaspoon or tablespoon measurements for things like baking powder, salt, vanilla, or cornstarch, for example.
watch how to make __
Printvalentine slice and bake sugar cookies
These slice and bake sugar cookies are perfectly soft and sweet with a touch of vanilla. They are an easy to make sugar cookie dough that is divided to make a colored and shaped core inside a log of dough. Once cut, the shape inside is revealed. You can use natural food coloring for this if you’d prefer, or even powdered freeze dried fruit.
Ingredients
170g (¾ cup) unsalted butter, room temperature
150g (¾ cup) granulated sugar
1 tsp Diamond Crystal kosher salt (or ½ tsp regular table salt)
2 tsp vanilla bean paste or extract
½ tsp to 1 teaspoon almond extract, optional
1 egg
240g (2 cups) all purpose flour
20g (2 tbsp cornstarch)
½ tsp baking powder
gel food coloring of choice
white nonpareils
egg white
Instructions
Start by creaming together the butter, sugar, and salt in a mixing bowl. Add the egg, vanilla extract, and almond extract and mix until emulsified.
Add the flour, cornstarch, and baking powder and mix just until combined and there are no clumps of flour or butter.
If you have a scale, weigh the dough. Mine weighed 650g. Divide the weight of your dough by three, and put one third of your dough back into the mixer. (I put 217g of dough back into the mixer.) Set aside the two thirds weight of dough.
Add a couple drops of pink or red gel food coloring to the dough in the mixer and mix on low until combined. You may need to gently knead the dough by hand or with a spatula to evenly distribute the color while not over mixing the dough and causing it to become tough.
Drop your now pink dough onto a lightly floured sheet of parchment paper. Lightly flour the top of the pink dough and cover with another sheet of parchment paper. Roll into a thick, even layer of dough, about ⅜″ or ½″ thickness. It really helps to have a guided rolling pin. Freeze the sheet of pink dough for five minutes.
Use a tiny heart cookie cutter to cut out several hearts from the dough. Re-roll the scraps and cut again until there is no dough left. If the dough is too sticky, freeze for five minutes before cutting hearts again.
(Don’t worry if your hearts get a bit misshapen. It’s going to happen because we are not chilling the dough. When we press them all together, they’ll be fine.)
Stack all of the hearts together, making sure to line them up properly. Use your fingers to gently press and smooth the sides of the heart “log” to shape them and adhere them together.
Roll a snake of plain dough and press it into the divot of the heart log. Continue adding flat pieces of plain dough all around the heart log until it is evenly covered.
Roll the log to smooth it. Place the log onto a piece of parchment paper the long way and wrap the paper around once to meet the parchment. Gently squeeze the dough. log from the center out to carefully stretch and lengthen it. Once it is about 10″-11″, roll it until it is smooth. The log will end up being about 12″. It is okay if your log is a bit thinner or thicker.
Wrap the log in parchment paper and then wrap it again in plastic wrap so it is secure. Refrigerate for at least two hours or overnight. You could also freeze it for up to three months.
Once the dough log has chilled, remove it from the wrapping and lightly brush it with an egg white. Roll the log in white nonpareil sprinkles to coat.
Evenly slice the log of dough in ½″ slices. (This may seem thick, but they spread in the oven, which thins them out significantly.)
Bake the cookies at 350 F for 9-11 minutes or until the top of the cookie is no longer shiny. Do not over bake or they will not be soft. If you like a crispy, crunchy cookie, slice them at ¼″ and bake until they start to get golden brown at the bottom edge.
Cool the cookies on the pan for a few minutes before transferring to a wire rack to cool completely. This recipe will make about 20-24 cookies if you cut at ½″, depending on how long you roll your log.