malted milk chocolate cut out sugar cookies with vanilla salty malty glaze
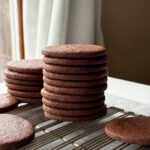
These chocolate sugar cookies are soft with a crisp edge and a rich chocolatey, malty flavor. You can decorate them with royal icing or with this delicious malty powdered sugar glaze that is perfect for quick and easy decorating by dipping. A splattering of food coloring makes these cookies perfect for spring.
Ingredients
malted milk chocolate sugar cookies
226g unsalted butter, room temperature (1 cup)
100g granulated sugar (1/2 cup)
55g brown sugar (1/4 cup, packed)
1 tsp Diamond Crystal kosher salt (or 1/2 tsp regular table salt)
1 whole egg OR 2 egg yolks (large sized)
1 tsp vanilla bean paste or extract
270g all purpose flour (2 1/4 cup)
55g Dutch process cocoa powder (2/3 cup + 1 Tbsp)
45g malted milk powder, chocolate version (1/4 cup)
1/2 tsp baking powder, optional (skip if you’re going to decorate with royal icing and prefer less spread and puff)
vanilla salty malty glaze
120g powdered sugar (1 cup)
2 Tbsp whole milk (plus a little extra just in case)
1 Tbsp malted milk powder (original, not chocolate)
1 Tbsp corn syrup
1 Tbsp butter, melted
1/4 tsp Diamond Crystal kosher salt (or 1/8 tsp regular table salt)
1/2 tsp vanilla bean paste or extract
Instructions
make the cookie dough
Starting with room temperature butter, mix with the sugars and salt until slightly creamed (lighter, fully combined). Add the vanilla and egg, mixing until just combined. Scrape the sides and bottom of the mixer bowl to make sure there are no bits that haven’t been mixed.
Add the flour, cocoa powder, malted milk powder, and baking powder (if using). Mix on low speed until the dry ingredients are fully incorporated.
Roll the dough between parchment to your desired thickness, I like 1/4″, before chilling for about two hours (or up to five days if it’s sealed sufficiently).
When it’s time to bake, preheat the oven to 375 F (190 C) and cut shapes from the dough. Re-roll the scraps, chill for about 10 minutes, and cut shapes again. To help keep the shapes of the cookies, I like to chill the cut shapes for about 10 minutes before baking them. This works out as one sheet is chilling while the other bakes. You can chill in the fridge or freezer.
Bake the cookies until they’re fully set and no longer shiny. This cookie is meant to be softer, so don’t over bake. If you prefer a crunchier cookie, roll a bit thinner and bake for longer.
Once the cookies are baked, allow them to cool for five minutes on the sheet before transferring to a wire rack to cool completely. Moving them prematurely can cause them to break.
make the vanilla salty malty glaze
*If you’re a person who likes a good amount of icing, or if you make the icing on the thicker side, you may want to double the glaze icing recipe.
While the cookies are cooling, make the glaze. To a shallow, wide mouthed bowl (or at least a bowl with a mouth wide enough to dip the cookie into), add the powdered sugar, milk, and malted milk powder. Stir well until the malted milk powder has dissolved. Add the corn syrup, melted butter, salt, and vanilla and stir until well combined. The consistency should be thick but pourable. It should ribbon off a spatula. If it is too thick, add more milk (a little at a time) until it is the right consistency. If it is too thin, add a bit more powdered sugar until it is the right consistency.
If you’d like to color the icing, now is the time. You can color the entire bowl of icing or separate it into smaller bowls for more variety of colors. (You may want to double the icing recipe if you want multiple colors.)
Dip each cookie by holding it securely upside down and gently pressing it into the surface of the icing, allowing the entirety of the cookie to come into contact with the icing. Allow the excess to drip off back into the bowl. Place the cookie down on a wire rack or piece of parchment paper, giving the icing time to set. (About twenty minutes should do the trick.)
Squeeze a bit of black or brown food coloring into a little bowl and add some water until it is slightly more liquidy. Use a paintbrush to splatter drops of food coloring onto the cookies so they resemble eggs.
Enjoy!