m&m cookies with brown butter
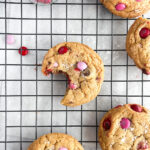
Brown butter chocolate chip cookies, but with m&m’s instead of chocolate chips. The crunch of the candy coating paired with the melty chocolate inside a classic, chewy chocolate chip cookie is unbeatable.
- Yield: about 26 cookies 1x
Ingredients
226g (1 cup) unsalted butter
100g (1/2 cup) granulated sugar
220g (1 cup) brown sugar, light or dark
1 1/2 tsp Diamond Crystal kosher salt (or 3/4 tsp regular table salt)
2 tsp vanilla bean paste or extract
2 eggs
1/2 tsp baking powder
1 tsp baking soda
300g (2 1/2 cups) all purpose flour
10 oz. m&m’s, divided (8 oz. for the dough and 2 oz. for the tops)
flakey salt, for sprinkling on top (optional)
Instructions
Start by browning some butter- don’t be scared of this if you’ve never done it. It’s insanely easy. Melt butter in a saucepan over medium-low heat (you do not want a high heat for this). It will start to sizzle and bubble, which is the water cooking off and evaporating. Stir it every once in a while, paying attention to when the sizzling starts to calm down. That’s when the water has nearly been evaporated, and it’s important to start stirring often. The color will start to turn golden and the milk solids will start to brown. It browns very quickly at this stage, so don’t walk away. Once the butter has turned a rich golden brown and smells very toasty and toffee-like, pour the butter into a heat proof mixing bowl, quickly scraping the bottom of the pot to make sure the milk solids are also transferred to the bowl. Cool the butter for about ten minutes. I like to pop my bowl in the fridge while I gather the rest of my ingredients.
Once the butter has had a chance to cool down slightly (it will still be warm), add the granulated sugar, brown sugar, and kosher salt.
Using a wire whisk, aggressively whisk the sugars really well into the butter for a couple minutes. The mixture will look like wet sand. Add the eggs and vanilla and whisk well for another couple of minutes until the mixture is emulsified.
The mixture will be thickened and much lighter in color. Add the flour, baking powder, and baking soda. Use a spatula to gently stir the dry ingredients into the wet until it is almost combined, but not quite.
Add 8 oz. of m&m’s to the dough and finish mixing with a spatula until there are no more dry spots in the dough.
Using a #30 cookie scoop, scoop the dough into balls and place them right next to each other on a parchment lined baking sheet. Press the remaining 2 oz. of m&m’s into the tops of the dough balls. Wrap the sheet in plastic wrap and put in the fridge overnight for 24 hours.
If you need cookies right now, feel free to skip the chill time. If you have a couple hours, chill them for a couple hours. They are even better chilled, but it’s not that serious, and they are delicious even without chilling.
Bake the cookies at 350 F for 10-14 minutes. Take them out when the tops are not shiny or wet looking and the outer edge of the cookie is golden brown. The center may look underdone, but it will set up on the cookie sheet. Leave the cookies on the hot cookie sheet to cool for five minutes before transferring them to a wire rack to finish cooling. Sprinkle them with flakey salt.
Notes
- Mise en place’ is a French phrase with the idea of putting everything in its place before beginning to make a recipe. It helps everything to go smoothly and eliminates so much possible stress. Getting all of your supplies and ingredients together beforeever starting the recipe will help tremendously.
- Weigh your ingredients, particularly the flour. It is the most important measurement in this recipe to weigh. Flour can be off in volume measurements by up to 30g, which is a quarter cup! Having incorrect flour measurements can cause your cookies to spread too much or, alternatively, be dry and crumbly. Weighing your ingredients makes everything so much easier, as you don’t have to wash all the measuring cups at the end. However, I do not use the scale to weigh out teaspoon or tablespoon measurements for things like baking powder, salt, vanilla, or cornstarch, for example.
- Be careful not to burn the brown butter. It should be warm golden brown, not black brown. Your nose will be your guide. If it burns, best to toss it and try again than risk making cookies that taste burnt from the get-go.
- For perfectly round cookies, use a large metal cookie cutter to scoot the hot cookies into shape. I’m addicted to doing this.
Find it online: https://linenandgray.com/mm-cookies-with-brown-butter/